Magento is a rapidly growing platform for eCommerce ventures, and for very valid reasons.
Countless retailers, business owners and entrepreneurs have taken their eCommerce ventures to Magento and achieved great profits. The best part? You can too.
While it is hopeful to assume that your business will grow, if you are fairly confident that your store will remain relatively small (likely due to a particular niche), using Magento might be overkill.
In this case, using other stores such as Shopify might be a better option.
If Shopify sounds like something you’d like to learn more about, you can check out our Ultimate Guide to Shopify here.
Right out-of-the-box, Magento 2 is an open-source eCommerce platform actively developed since 2008. It typically works best for massive eCommerce websites with dozens of categories and thousands of products because of its scale.
It is currently owned by Adobe, the third most popular eCommerce CMS, and it’s used by 10% of eCommerce websites.
It is by far one of the most search engine friendly eCommerce platforms available today. Multiple agencies love using Magento for large eCommerce projects because of its massive scope and usability.
Just some of its best features are:
- Its unparalleled customisation
- A robust set of built-in SEO features such as product meta tags
- SEO-friendly URLs, prefixes and suffixes for title tags and rich snippet extensions
- The ability to edit robots.txt files
- Its clear site structure,
- One product – one URL feature
- Many product variants under one URL
- Automatic 301 after URL change
- Its support for structured data
- Related products section by default
- Automatic sitemap generation (with images)
- It’s open-source and actively developed
- There are multiple SEO add-ons, and much more.
Magento’s automation skills are pretty impressive, which include some pre-installed basic SEO features. Plus, the default UI is simple and well-organised.
On top of that, the web site’s structure is easily manageable and has some advanced on-page and off-page SEO techniques.
One of the best aspects of the Magento platform is its ability to cater to small hobby stores, mid-market, and enterprise-scale customers alike.
However, Magento isn’t always the ideal option. Whether you’re migrating an existing store or starting a new one from scratch, Magento is a relatively tough developer to work with.
For this reason, starting out with Magento will require a learning curve as well as a good developer by your side.
Web performance is its biggest downside, making a good hosting provider an indispensable addition to your list of needs.
The default platform version itself comes with no extensions installed and so, naturally, is resource-demanding.
Therefore, if you don’t have a team of experienced developers, you will have a hard time trying to make your website run fast and smoothly.
Some other cons include:
- Poor performance
- Its JavaScript-heavy
- There’s no easy way to deindex pages
- You cannot alter canonical tags by default
- There are no Hreflang tags by default
- An overly complex configuration
- Limited bulk operations inside the admin panel
- No blog feature by default
- Programmers’ hourly rate is high when compared to other platforms
However, by using the right theme, extensions, SEO techniques, features that are unique to Magento, and by following some of the best SEO practices, you can conquer top rankings for your eCommerce store.
Let’s get right into it, shall we?
Choosing Your Magento Edition
In our intro, we mentioned Magento Open-Source, but Magento Commerce Cloud is another edition which you may want to consider.

The Magento Commerce Cloud (formerly Enterprise Edition)
Magento Commerce Cloud is a paid, tailor-made solution that provides higher performance and a wide range of scalability for fast-growing and large businesses.
This edition gives you access to expert support within its plan as well as hundreds of extensions and features that you can use to power your store, giving you higher control over your website.
The Magento Open Source (formerly Community Edition)
Magento Open Source is available for free download and is more equipped for developers who know their way around Magento. Or, alternatively, for small businesses who want or have hired a developer on their own behalf.
This edition of Magento is an open-source solution (free) and gives you access to community support, as well as all basic Magento functions.
These include adding product categories, user groups, coupons etc. as well as some unique features like multi-stores, related products, upsells and cross-sells.
You can use Magento either as an open-source platform or the paid Magento Commerce version, depending on your expectation of functionalities and customer support.
You should always do your research before selecting your plan and go for the edition that suits you best. Although it is possible, migrating from community to enterprise or the other way around isn’t entirely straightforward (unless you choose to add the enterprise features individually).
The SEO Features
Magento is well built for SEO and offers multiple tools for drawing traffic and increasing visibility.
While some of these tools are built-in, you can also add external extensions to further increase your search engine visibility.
Like most other websites, ranking your Magento store on Google takes a considerable effort, consistency, and patience.
But in essence, ranking your store is about:
On-page optimisation: This includes improving your site’s relevance by appropriately incorporating relevant keywords across your site.
While we can all agree on how important keywords (and keyword research) are, creating genuinely useful and purposeful content to satisfy your visitors will deliver even better results.
Off-page optimization: To build your store’s authority and trustworthiness in the eyes of Google and customers, off-page tactics like building backlinks and earning user-generated content is key.
These usually include title tags, heading meta description optimisation, and so on and so forth.
Technical optimization: This involves some slightly more advanced optimisation techniques such as using structured data, optimising images, and minification of code.
Titles Tags
Magento easily allows you to control the meta titles of your webpage.
While there is a limit of 255 characters for each of them, using longer tags isn’t recommended anyway.
Keeping the title tags short gives you the upper hand of keeping it exactly how you want to. Going overboard will mean that Google will have to shorten it for you.
The importance of your page titles is reflected through a direct impact on both your rankings and click-through-rates (CTR). Your titles influence search engine crawlers and visitors which is why satisfying them should be your number one priority.
Google displays only the first 50-60 characters of most page titles before truncating them.
In addition, always try to include the main keywords at the start of the title, if you are unable to keep the title count short. Search engines, as well, prefer early keywords.

To start off:
- Edit the default title and description of the homepage of your store.
- Go to Content > Design > Configuration and look for Default Store View.
- Click the Edit link to adjust the Default Store View homepage’s meta information.

Here, type in your brand’s title or name in the Title Suffix and add a description. The Title Suffix appends your brand’s name to each title tag and thus, allows for consistent branding.
To edit titles for product pages:
- Go to Admin > Products > Catalog and click on Edit Product.
- Go down to Search Engine Optimization to fill in the Meta Title and Meta Description (as shown below).

Follow the same process for Categories and Content pages to make necessary changes.
Make sure that you create persuasive and engaging page titles that people can’t resist clicking on.
A good title is typically easy to read, includes keywords, and the most powerful CTA prompt for the user.
Furthermore, you should use only one H1 tag on each page for crawlers to easily identify the title.
Headings
Whether headings on your Magento store have been used correctly or not depends on two things:
- How headings are structured within your theme.
- How you use headings in your content – which is entirely up to you.
A good heading structure helps visitors quickly scan a page, and helps search engines easily understand its structure and topic.
This is usually achieved by using subheadings H2, H3, and so on in a proper hierarchy. Also, try to include your primary keywords in all the subheadings as well.
Stick to these heading best practices:
1. Don’t wrap logos or images within H1 heading tags, as it conveys the main topic of the page. Instead, use relevant keywords.
2. Use only one H1 heading per page.
3. For readability, stick to a maximum heading length of 60 characters.
4. Don’t use headings for elements that are present on every page, such as the search functionality.
5. Don’t apply H2 headings to product names on product category overview pages.
6. Build up your heading structure with a logical hierarchy of:

7. The product-category, product, and page names, all use H1 headings by default, so make sure you optimise them to the fullest!
8. Don’t use H1 headings in the body content, because that will lead to having multiple H1 headings which crawlers aren’t very fond of.
Meta Descriptions
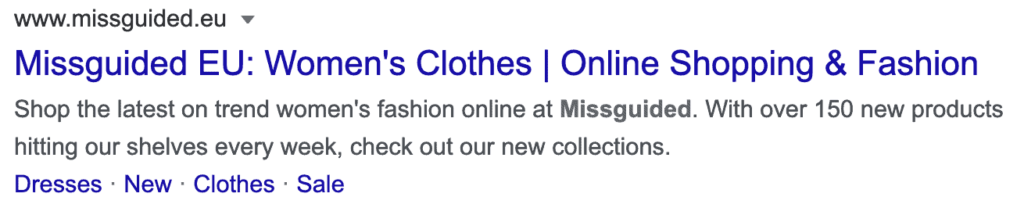
The meta description refers to the short text shown in the SERPs below the title and the URL.
As with the title tag, your meta description should not only need to appease Google crawlers but all leads and potential clients who visit your website to click through to your shop.
Think about the value of the propositions you’re offering to your clients while writing meta descriptions.
Do you offer free/fast delivery, or does an offer/sale exist?
For example, you could use the meta description to communicate that you refresh your collection every week with new collections and items. This might facilitate further click-throughs to your online store.
To define the homepage meta information, log on to your Magento backend and navigate to:
- Content > Configuration (under Design).
- Look for Default Store View and click the Edit link after it to adjust the Default Store View homepage’s meta information.

Scroll down to HTML Head under Other Settings and expand the setting options.

While optimising the meta description of every page can be very rewarding to your website’s SEO, it is also time-consuming to reformat from scratch.
Therefore, it is a good idea to use an extension like SEO Meta Templates by Magento to create templates which you can reuse and quickly edit for all pages.
Here’s an example of a meta description template for category pages:

And product pages:

A reminder, keep your meta descriptions short – under 155 characters, to avoid the risk of being truncated in the SERPs.
Also, try and include all relevant keywords in the description, especially at the beginning.
You can ignore the Default Page Title and Default Meta Description fields, as they aren’t used within Magento by default.
The Default Meta Keywords field can be ignored as well since they haven’t been used by search engines for over a decade and play no role in SEO.
The two remaining fields, Page Title Prefix and Page Title Suffix, do matter, however.
Page Title Prefix: it is recommended that you keep this field empty, as whatever you add there is added at the start (and the most important part) of the title. Having a generic prefix isn’t SEO savvy, so keep it empty.
Page Title Suffix: fill in with – shopName, for example, Pearl Lemon. This will be added at the end of every page title, which helps you from a branding point of view.
Meta Tags for Products
In Magento 2, they have added one new feature for meta tags: Fields Auto-Generation.
Applied on a global level, it will help you create product metadata templates.
This new setting can be found here in Stores > Configuration > Catalog > Catalog > Product Fields Auto-Generation.

This will act as a perfect tool for a store with many items, which saves store owners a lot of time. But it comes with a few drawbacks as well:
- Auto-generated fields are global configurations so you cannot change them for category-wide products.
- Only 3 place holders are available: {{name}}, {{description}} and {{sku}}.
- Since most product descriptions are longer than 25-240 characters, the {{description}} place holder might not be the best choice for your meta tag description field.
- If you want to modify the product specifics or make any changes, they will not be reflected on the current products where the information has already been applied.
All in all, the new Auto-Generation feature for Product Fields is useful, but as of now, it has several limitations.
Apart from Products Fields Auto-Generation, you can also edit meta description and title from the product page settings here at Catalog > Products > Select & Edit Product > Search Engine Optimisation.
The settings from here will overwrite the global meta description added from Fields Auto-Generation. This method is effective but super time-consuming if you have a lot of products, which is probably the case for most Magento stores.
Meta Tags for Categories
Just like for products, you can also set up the metadata for categories locally at the category level.
Location for Category level metadata setting: Catalog > Categories > Search Engine Optimisation. Here you can add meta title, keywords and description as per your requirement.

Meta Tags for Content pages
You can change the title tags for your content pages from Content > Pages > {{content page}} > Search Engine Optimisation.
URLs and Redirects
A strong, user-friendly URL is a significant factor used by search engines to rank a website.
In fact, according to Google:
“A site’s URL structure should be as simple as possible. Consider organising your content so that URLs are constructed logically and in a manner that is most intelligible to humans.”
A good URL structure is one that works efficiently for both visitors as well as for search engine crawlers.
Your URLs must satisfy this checklist to be SEO-optimised:
- Descriptive and easy to understand
- Precise
- Coherent
- Lowercase
As opposed to a URL like www.example/women/product35574.com, the URL www.example/women/product.com is much more readable for both search engines and potential customers.
Essentially, your URLs must be succinct, consistent, and lowercase.
Using your admin panel, you can easily modify the category and product URLs.
Magento automatically creates 301 redirects from old URLs, which is really handy and saves you a lot of work from rewriting them whenever you modify a URL.
Remember, though that you should avoid modifying your URLs unless necessary.
Product or category URLs with parameters are automatically canonicalised to their canonical versions.
You can manage a store’s redirects and rewrite settings by logging on to your Magento backend and navigating to:
Stores > Configuration (under Settings) > General > Web.
1. Select the Store View at the top of the page that you wish to change the settings for, which is the Default Store View in this example.
Note: Changing the settings at a higher level affects other views of the shop, so be cautious. You can give this guide a quick read before you go on editing here.
2. You’ll find the Add Store Code to URLs field under URL Options. To make sure URLs are descriptive and easy to read, keep their value set to their default ‘No‘ setting.
3. The Auto-redirect to Base URL field allows you to automatically redirect visitors and search engines to your store without a subdomain when they request it (for example, when https://pearllemon.com is requested, customers are redirected to https://pearllemon.com), or vice versa.
Although this is a great function, it is designed to use a temporary 302 redirect rather than a 301 redirect by default.
4.You can change this value (under Auto-redirect to Base URL) to ‘Yes (301 Moved Permanently)’ to make sure link authority from incorrectly placed links is passed on as much as possible to the right URL.
5. You can find the Use Web Server Rewrites field under Search Engine Optimisation, which specifies that your store can use URLs which are readable.
It is set to Yes by default, and it’s best to keep it that way.

Removing the .html Extension
By default, Magento adds the .html extension to all URLs. It’s thus recommended that you remove the .html extension to prevent potential issues further down the road such as switching to a different eCommerce platform.
In light of this, it is best to remove the .html extension if you’re starting from scratch. Removing it from an active Magento store, results in a migration of the URL that you want to avoid as much as you can.
To remove the .html extension from the URLs, log on to your Magento backend and navigate to:
- Stores > Configuration (under Settings) > Catalog > Catalog > Search Engine Optimisation.
- Select the right Store View which you want to adjust the settings for at the top of the page. In this example, this is Default Store View.
The fields Product URL Suffix and Category URL Suffix should be visible in the screen in front of you. Both fields have value .html.
Removing that value from both fields will lead to URLs such as https://pearllemon.com/category for category pages, and https://pearllemon.com/product for product pages.
If you prefer to have a trailing slash at the end of all URLs, you can fill in ‘/’ in both fields, leading to URLs like https://pearllemon.com/category/ and https://pearllemon.com/product/.

Short URLs’
In that same screen, you can choose whether or not to include the product-category key in a product’s URL—for example, https://pearllemon.com/category/product/.
By default, the Use Categories Path for Product URLs is set to No.
Keeping it this way ensures that the URLs stay short. This is particularly important if you have subcategory categories because URLs can become long very rapidly.
If your store has items with very similar names, it is recommended that a unique identifier, such as SKU, be included in the URL of a product.
Unfortunately, you can’t configure this in the Magento 2 backend, but you can use an extension for this such as the URL Rewrites Regenerate & Customise by WebPanda.

Automatically Redirect URLs If The Key Changes
In cases where the URL key changes after pages have been published, it is ideal for redirecting visitors and search engines to the right URL when they request the old URL.
By default, this is turned on in the Create Permanent Redirect for URLs if the URL Key Changed field as it is set to Yes. Keep it like this; it’ll save you a lot of trouble in the long-run.

Regardless of which one you choose, you must give a permanent redirect (301) from the non-preferable URL for the preferable URL:
- Navigate to Stores > Configuration (under Settings) > General > Web.
- Enter your selected base URL in the fields for the Base URL and Base Link URL.
- Under Search Engine Optimisation, set Use Web Server Rewrites value to ‘Yes’. Lastly, under URL Options, set Auto-redirect to Base URL to Yes (301 Moved Permanently) and click Save. This ensures that the link authority from incorrectly placed links is passed on fully to the correct URL.
It affects both SEO and user experience to have broken links (“404 not found” error) on your website.
So when a page in your store becomes inactive, you must redirect the page to another relevant one on your site.
This offers visitors (and crawlers) a new destination instead of a frustrating mistake, such as when you delete a product or category.
Keep in mind that you shouldn’t simply redirect deleted/inactive pages to the homepage or to an unrelated page. Only redirect to a page that’s relevant to the deleted page.
Magento 2 has an elegant built-in redirection tool you can use to set up 301 redirects which permanently transfer the SEO juice from the previous page. Go to Marketing and click on URL rewrites.
Click Add URL Rewrite. Here you can see Create URL Rewrite on the dropdown list, leave this on its default setting (Custom).
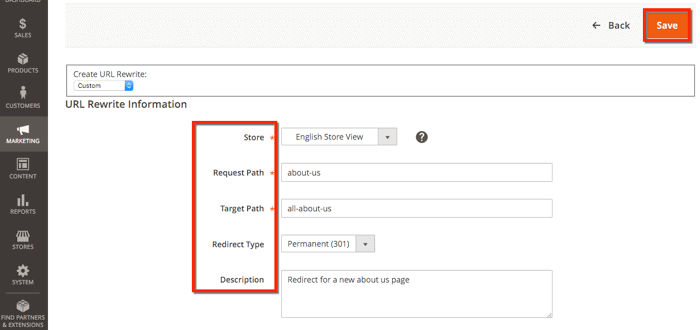
Next, fill in the Store, Request Path, and Target Path fields. The Request Path is the original path, and the Target Path is the new path that corresponds to the new web page. This will be the target URL for your redirect.
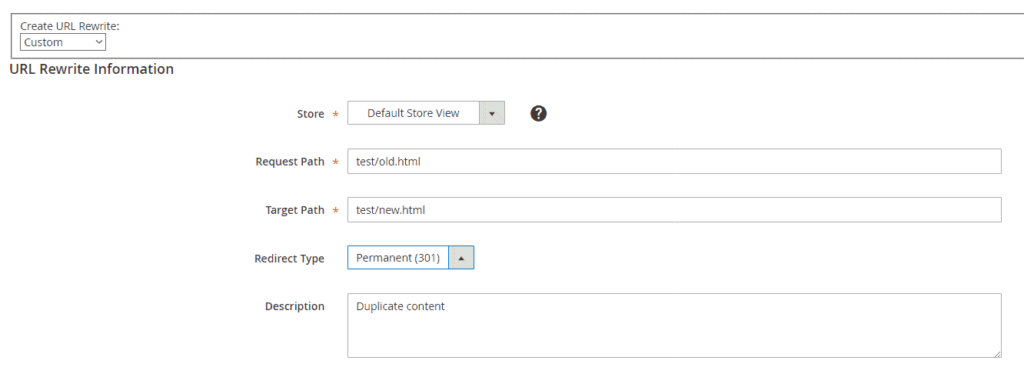
For the Redirect Type, choose 301 and hit Save.
Also, remember to set up a 301 redirect from the old URL to the new URL every time you alter a URL after it has gone live; otherwise, you’ll create a 404 error on your web.
XML sitemap
XML sitemaps are an efficient way to communicate to search engines what pages they need to crawl and index.
They can also be easily created next to the regular product and categories URLs, including image URLs.
Keep in mind to update your sitemaps periodically, place your links in robots.txt, and upload them to Google Search Console.
Do this every time you add new items or categories to your store so that they can be identified as easily as possible by Google.
Remember to delete them from your sitemap when any of your items are no longer available.
The best practices around XML sitemaps are as follows:
- Keep the XML Sitemap up to date with the content on your website.
- Only include pages which can be easily indexed.
- Avoid listing more than 50,000 URLs in a single XML Sitemap.
- Make sure the (uncompressed) file size of the sitemap doesn’t exceed 50MB.
- In the robots.txt file, reference the XML sitemap.
To configure the XML sitemap, log on to your Magento backend and navigate to:
- Stores > Configuration (under Settings) > Catalog > XML Sitemap.
- Select the Store View you want to adjust the settings for, at the top of the page. In our example, this is Default Store View.
- By default, the options for categories, products, and CMS pages are configured correctly, and images are included in the XML sitemap.

The choices for groups, items and CMS pages are correctly configured by design.
Google does not use the Frequency and Priority tips, so there is no need to change anything there. Photos are used by default in the XML sitemap as well.
Generation Settings
To manage the generation settings for the XML sitemap, select Default Config for Store View at the top of the page.
Once you are able to reload the page, you can scroll down a bit, to see that you can define if, when, and how often you need to regenerate the XML sitemap under Generation Settings.
The Enabled field, by default, is set to No. Adjust this to Yes, because you would like to regenerate your XML sitemap automatically.
Setting the start time to 03:00:00 will ensure the regeneration of the XML sitemap at 3 AM.
This is just an example; shift this value for your store to the quietest time of day, as it will temporarily render your Magento store slower by regenerating the XML sitemap.
To ensure that the XML sitemap is regenerated every day, save the value of the Frequency field to Regular.
This too is just an example: if your store content changes just once a week, regenerating the XML sitemap once a week makes more sense.
Limits and robots.txt
Under Sitemap File Limits, you’ll find the fields Maximum No of URLs Per File and Maximum File Size.

For most Magento stores, the default Maximum No of URLs Per File limit is correct as it aligns with SEO best practices.
It can be beneficial to break your XML sitemap into more files temporarily if you are running into indexing problems. Then you can better define the indexing problems.
For instance, if you have 200,000 items split into four XML sitemaps, and you experience indexing problems, checking the Google Search Console coverage report of the Sitemap doesn’t tell you that much.
You’d get better insights by breaking up those 200,000 items into, say, 20 XML sitemaps.
Alternatively, you could create separate XML sitemaps per product category to help pinpoint indexing issues within product categories.
Maximum File Size
You can raise the maximum file size to 52428800, as this equals 50 MB.
Enable Submission to Robots.txt
The Allow Submission to Robots.txt area, which has a default value of No, is found under Search Engine Submission Settings. Turn this to Yes, as you want your XML sitemap referenced by your robots.txt file.
If this is all set up, it’s time for the XML sitemap to be generated and its (re)generation settings configured.
Go to Marketing > Sitemap to do this (under SEO & Search) and press the Add Sitemap button in orange.

In the screen that follows, you define the XML sitemap’s name and location:
- Fill in the XML Sitemap’s name in the field Filename, example: sitemap.xml.
- Then fill in the XML sitemap’s path in the Path field – for example,/pub/ in our case because of the nature of the Magento installation in our test setup.
Next, click the Save & Generate button, and you’re all done!

Robots.txt
Magento gives you complete control over the robots.txt file, as an open-source solution.
When you start your eCommerce shop, before even making your store public, you should consider blocking the entire search section on robots.txt. Why? To reduce the risk of generating an infinite number of URLs there.
When they are found by Googlebot, you can end up with a huge amount of thin or duplicate material.
When it comes to accessing URLs on your website, the robots.txt file informs crawlers of the rules of engagement.
For eCommerce stores, and this also applies to Magento stores, it is important to use the robots.txt file to send search engine crawlers in the right direction.
This then prevents them from touching the wrong URLs in an attempt to:
- Keep them from reaching potential crawler traps.
- Prevent duplicate content.
- Efficiently benefit from your precious crawl budget.
Though search engines claim to be good at detecting crawler traps, they must first go down one to find out later that it is actually a crawler trap.
And the Magento 2 store has a variety of URL patterns that you don’t want search engines to touch.
Here are the pages we recommend barring off from search engines:
1. Internal search result pages: /catalogsearch/ and /search/.Although adding the noindex robots directive (either meta tag or HTTP header) as a second line of defence to these pages is recommended, the first line of defence is the robots.txt file.
2. Login pages /customer/account/login/ – login pages.
URLs containing SID and PHPSESSID parameters.
3. Filtering criteria such as price, color, material and size.
This boils down to the following robots.txt:
User-agent: *
Disallow: /catalogsearch/
Disallow: /search/
Disallow: /customer/account/login/
Disallow: /*?SID=
Disallow: /*?PHPSESSID=
Disallow: /*?price=
Disallow: /*&price=
Disallow: /*?color=
Disallow: /*&color=
Disallow: /*?material=
Disallow: /*&material=
Disallow: /*?size=
Disallow: /*&size=
We suggest using both ways in which a criterion is used in URLs. For example, with price that’s both /*?price= and /*&price=.
Editing your robots.txt file in Magento 2
In order to edit your robots.txt file in Magento 2, navigate to:
1. Content > Configuration (under Design).
There, edit the settings for the Main Website instead of the Default Store View, because the latter won’t allow you to change the robots.txt file.

Navigating to the robots.txt settings in Magento 2.
2. On the screen that follows, scroll down to Search Engine Robots. There you can define your robots.txt content:

It should also be noted that you shouldn’t change the value of Default Robots, as that’s the site-wide robots directive value.
Crawling and Indexing
This section explains how you need to configure Magento to make it easy for your store to crawl through search engines, and to understand what and what they need to index.
Implement Canonical URLs for Homepage and CMS Pages
By default, Magento doesn’t add self-referencing canonical URLs to its homepage and CMS pages which means that you’re at risk of having duplicate content.
In order to fix this, you have several options:
- You adjust the template to always include the self-referencing canonical URL for the homepage and CMS pages.
- You add a custom XML block to pages, where you manually define the self-referencing canonical URL for the homepage and CMS pages.
- You use a plugin for this, like for example Canonical URL by FMEextensions.
Using Canonical URLs For Products and Categories
Canonical URLs give search engines a strong hint with regards to what page they need to index.
So, you can do this with the canonical URL in a situation where you have one product with several variants, and you want to tell search engines that they are only indexing the product page and not the variant pages.
By default, the use of canonical URLs is turned off in Magento.
With this setting turned off, a product is available through both its own URL and a URL that includes the category: https://example.com/product/ and https://example.com/category/product/.
This leads to situations where these pages are competing with each other for a search engine’s attention.
To turn on the use of canonical URLs, log on to your Magento backend and navigate to:
- Stores > Configuration (Under Settings) > Catalog > Search Engine Optimisation.
At the top of the page, select the right Store View you want to adjust the settings for. In our example, this is Default Store View.
In the screen that this loads, you’ll find fields named Use Canonical Link Meta Tag For Categories and Use Canonical Link Meta Tag For Products. Change their values to Yes.
This will result in both product and product-category pages having canonical URLs, which significantly helps to prevent duplicate content.
Each product can be assigned to many different categories and still maintain the same URL. Multiple product variants can also be available under the same URL. That’s a great feature from the SEO perspective.

HTTPS
A precondition for success is serving your guests over a safe network and is completely supported by Magento.
Using HTTPS is important, particularly for eCommerce stores, because it all comes down to earning and keeping the confidence of your guests.
Displaying an SSL certificate on your store’s URL is absolutely essential for success.
This is especially true for online businesses as potential customers will have to enter their sensitive credit card information to complete the purchase.
HTTPS ensures a secure environment for customers and builds trust.
Enabling HTTPS in Magento 2
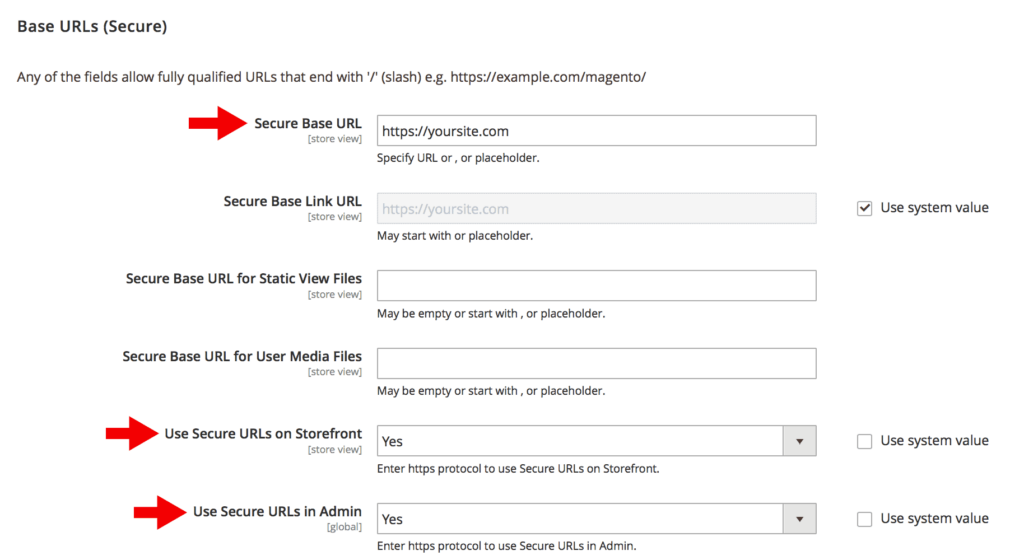
Configure your image settings by going to Stores > Configuration (under Settings) > General > Web.
There, expand Base URLs (Secure) and change the values of Secure Base URL and Secure Base Link URL so that they start with https.
Furthermore, change the value of the Use Secure URLs on Storefront, Use Secure URLs in Admin, Enable HTTP Strict Transport Security (HSTS) and Upgrade Insecure Requests fields to Yes.

Create a Backlink Strategy
The external links on other websites that point to your website are called backlinks.
In its ranking algorithm, Google considers the number, consistency, and importance of these links.
Truth be told, one of the most important factors that determine where your store will be ranked in the SERPs is the amount and quality of your backlinks.
Google views links as signs of trustworthiness and authority, and without a proper backlink strategy, your site won’t make it to the first page of SERPs.
So, to build high-quality backlinks to your store, here’s what you need to do on a consistent basis:
Blogger Outreach:
Each niche (food, technology, fitness, travel, etc.) has countless blogs, and some of those blogs have big followings.
These kinds of topics usually have a community built around them of a vast group of like-minded people who trust the content written by these top bloggers.
Blogger outreach is a process in which you work with bloggers to produce real, valuable content that promotes your brand or products.
In this way, to gain more brand recognition, you tap into their range of influence.
Of course, if you are just starting off, none of this is easy. It involves hunting down and identifying authority bloggers in your industry who are either at the same level of influence as you or more.
Next, you pitch them in a personalised way and let them know what’s in it for them (such as free access to your products, or a sponsorship deal) and what you want them to do for your brand.
Finally, once the content is uploaded, both you and the blogger promote it on your respective platforms, leading to the next stage of brand awareness for your company to new audiences (as well as for the blogger).
The content the blogger produces for your brand can vary across sponsored posts, product reviews, features, or even a giveaway contest.
During such collaborations, you are both equally invested in creating content that results in a win-win for both parties while being true to the audience.
Guest Posting:
A well-established, time-tested way to earn quality backlinks and improve your online brand visibility is guest posting.
Guest posting is about producing and contributing quality content, such as blog posts and infographics, to official sites and publications.
Besides boosting Google rankings, guest blogging also helps to attract new audiences and gain their loyalty. It also develops the thought leadership profile of your brand.
When looking for sites to guest post to or write for, your main focus should be on their domain rating and not as much on their following.
A domain rating of over 50 is recommended since lower ones don’t help your ranking on the SERPs, or worse turn out to be spam and do more harm than good.
Promoting Linkable Assets:
The development and publishing of widely shared content known as linkable assets is another excellent way to create backlinks to your website.
These can be in-depth guides, fun lists, or interactive infographics that you post on your own website. Then, you pitch them to your industry’s high-authority blogs and media publications with high domain ratings.
Backlinks are not easy to get. Just like you wouldn’t want to post anything less than high-quality content, expect others to have their reservations about the standard of content they are putting out on your behalf.
Not everyone will be keen on republishing and/or promoting your content on their own web property. However, if your content is truly high-quality, you won’t have trouble finding some (or even many) hosts that’ll be happy to do it.
Link Reclamation and Broken Link Building:
Link building isn’t just about putting out fresh content. Your brand may already be mentioned on several websites without being linked to.
One such white-hat strategy to get those unclaimed backlinks has been explained in How To Use Reverse Image Search To Generate High-Quality Backlinks in 2020, have a read!
Using tools and strategies like this to find such unlinked mentions allows you to contact those publishers and ask them to link to your site along with the mention. This technique is called link reclamation.
Also, you can do some digging on the web for broken links on relevant niche websites.
If you find a broken link for products/content similar to those you offer, reach out to the owner of the site. Let them know about the broken link, and request them to replace the broken link for a valid link to your site instead.
As broken links negatively impact a site’s SEO, this is a mutually beneficial activity for both parties – they get to fix a broken link, and you get a free yet effective backlink.
Usually, it’s the more, the merrier when it comes to backlinks. Bear in mind, however, that the quality of links leading back to your website is equally, if not more, important.
Thus a few natural backlinks from websites of high authority outweigh hundreds of links from websites of low authority or even spam.
Product Copy and Variants
Apart from titles, meta descriptions, and URLs, it’s important to optimise all your website content – blog posts, product descriptions, the “about” page, and so on – for primary and secondary (or “semantic,” i.e. related) keywords.
The information you supplement your product or service with should ideally be keyword-optimised.
Long-form content (>3000 words) such as how-to guides and listicles on a consistent basis will go a long way in hitting top rankings on Google.
You can target various keywords that have distinct user intentions by regularly putting out such useful content.
That is, some of the pages (such as blog pages) should target knowledge searches (e.g. “what is a jumpsuit”). In contrast, other pages (such as product pages) can target keywords that suggest a purchasing purpose (e.g. “buy women’s jumpsuits”) for lower search volume.
Moreover, proper internal linking throughout your site is important as well. In every piece of content, target informational keywords to build internal links to your product and category pages.
You can also choose to have a product variant available under a separate URL if it aligns better with your desired website structure.
One thing you need to pay attention to is that Magento lets you include the category path in the product URL, which may lead to duplicate content issues.
Page Speed
Page speed is a metric that’s an official Google ranking factor for both mobile and desktop searches. It’s also vital to user experience.
Having a slow-loading store is simply unaffordable as it will not only kill your rankings on Google but will frustrate potential customers and result in a high bounce rate.
Run your site through Google’s PageSpeed Insights tool to see how your Magento store performs and what you can do to improve your store’s speed.
Optimising your page speed involves a number of tweaks across your Magento 2 dashboard, which includes:
Magento Image Optimisation
All images on your website must be compressed to keep the file size as small as possible while retaining high quality. A slow site will result in a slow loading speed that hurts rankings with bulky product photos.
Ideally, for images, the file size should be less than 100 KB. For all product images, it is recommended that you use JPG (not PNG or GIF) format as it offers the highest quality for the smallest file size.
To compress the file size of images automatically while preserving good quality, use a free extension such as Compress JPEG & PNG Images.
In addition, make sure you have a simple descriptive file name for all your site photos (black-shirt.jpg instead of something like 258492107.jpg) and descriptive alt tags that indicate what each image is.
This is useful not only for search engine crawlers to understand the content better but also for visually impaired visitors who use screen readers.
To add alt text, go to Product > Basic Settings > Images and Videos > Alt Text and then add your alt text in the field. Plus, make sure to include keywords in both the file name and alt text of all images.
Minify CSS and JS in Magento
It is also possible that the comments and whitespaces in your source code, i.e. HTML, CSS, and JavaScript files are taking up too much space and slowing down your site.
Minification compresses the code by removing extra characters like spaces and comments, combining common styles, using shorter variable and function names, and so on.
This makes the file size smaller and lighter, which ensures that fewer bytes are transmitted from your server to the web browsers of your users, making the loading of your website pages quicker.
Modify your store’s JavaScript and CSS settings by going to Stores > Configuration (under Settings) > Advanced > Developer.
There, expand JavaScript Settings and change the value of Merge JavaScript Files, Enable JavaScript Bundling, and Minify JavaScript Files to ‘Yes’.

Likewise, expand CSS Settings and change the values of Merge CSS Files and Minify CSS Files, and – if your theme supports this – the value of Use CSS critical path to ‘Yes’.

Use a free extension like Minify HTML CSS JS to minify your HTML code easily.
Using AMP in Magento
Today, over half of the visitors (and conversions) to your store are from mobile devices, and with each passing day, this number is growing.
So, decreasing the page load times of your store on mobile devices is crucial.
Accelerated Mobile Pages (AMP), is an open-source framework developed by Google in collaboration with Twitter, which renders better, faster experiences on mobile devices.
It is a framework that allows you to build lightweight experiences for mobile by simplifying the HTML code and following streamlined CSS rules.
Google displays AMP material in a separate slot over organic results for certain searches. Thus, enabling AMP can be your secret to achieving top mobile search results rankings.
To automatically create Google AMP pages for home, category, and product pages, use the Accelerated Mobile Pages extension to easily and rapidly amplify the mobile speed of your website to get the lightning bolt next to your mobile search result listing.
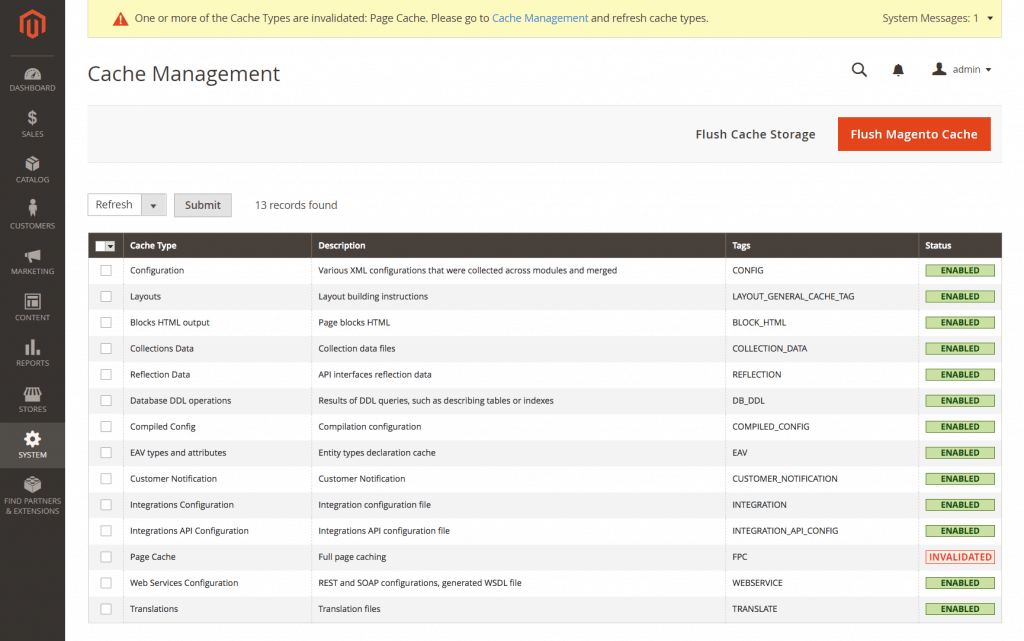
Configure Caching in Magento
Caching is the process of storing copies of files in a cache, or temporary storage location so that they can be accessed more quickly.
To enable the built-in caching features in Magento 2, navigate to System > Cache Management, and then mark all checkboxes, select Enable from the drop-down box, and hit Submit.
Cache Management
To enable full page caching, navigate to:
- Stores > Configuration (under Settings) > Advanced > System.
- Under “Full Page Cache“, you’ll find the Caching Application field.
- By default, it’s set to Built-in Cache, and you must change that to Varnish Cache. In the Varnish Configuration, fill in the details according to your hosting provider.
Adding Google Analytics And Google AdWords
Adding Google Analytics within your Magento store is the best way to funnel your SEO strategy by looking at real-time visitor behaviour with your store.
You can add Google Analytics very easily to your store from: Stores > Configuration > Sales > Google API > Google Analytics.

To enable Google Analytics on your store, you first need to have a Google Analytics account which you can use to add and to your Magento store.
You can find your tracking id under Admin > Tracking Info in your Google Analytics Account, which you can then use on the settings shown above.
Another good point is the feature to create multiple pages for the content experiment.
You can add a Google Analytics Experiment Code to any of your store product pages from here: Product > Advanced Settings > Product View Optimisation.

In Magento 2, implementing Google AdWords has become very easy. You can find the configuration here at Stores > Configuration > Sales > Google API > Google AdWords.

Details about all the fields mentioned above can be easily found in your Google AdWords account.
Structured Data
If you want your store’s listing to be super prominent in the Google SERPs, you need to add structured data markup to your Magento 2 site.
That is, if you provide Google with a bunch of data in a specific, structured format (hence the name “structured data”), you can have your product pages stand out in the SERPs, such as through rating data:
In comparison to traditional performance, such a listing instantly catches the interest of the consumer and is much more convincing to click on.
Moreover, a higher click-through-rate (CTR) would suggest to Google that your site deserves a higher ranking in the SERPs.
Simply put, structured data markup gives search engines more information about your store and its content.
Structured data (or schema markup) in the sense of eCommerce will provide Google with valuable information about your goods (such as pricing, availability, ranking, number of reviews, etc.) that can then be displayed by Google in the SERPs in the form of rich snippets.
There are various structured data formats you can use:
- JSON-LD
- RDFa
- Microdata
However, using JSON-LD is recommended by Google as it’s the easiest to add and update, and it is compatible with dynamic data.
Product schema is the highest priority structured data for eCommerce websites such as is the case for your Magento 2 shop.
This is because it helps to extract potential buyers from the SERPs by providing useful details such as feedback, price and availability.
Rich Snippets or Microdata
One of the best features added to SEO settings for Magento 2 is this.
The microdata is added to all the product pages by design. This is a decent start, but there’s still a long way to go.
It’s a nice feature, but it can be enhanced by extensions which you’ll need to add yourself if you want to add a search tool, organisation or breadcrumbs.
Under Rich Snippets, they will not be added automatically.
The easiest and most effective way to implement rich snippets for the products on your website is to use an extension like Rich Snippets (free) or Rich Snippet Suite.
You don’t need any coding knowledge – the set up of these extensions is extremely straightforward, and you can get started with structured data implementation right away.
Template Optimization for SEO
The Magento Marketplace has some pretty cool templates, or “themes” available. Not all of them, however, are designed for SEO.
There are things which you will need to take care of directly. To help you through a custom-designed Magento website, have a look at our web design and production services!
Typically, optimising your Magento 2 template or theme for SEO involves things that are already covered. These include minifying CSS/JS, caching, and image compression. But there’s more you can do, such as:
Cleaning up the code:
In many themes, there’s lots of unused code written which leads to unnecessarily big file sizes.
You can overcome this by moving all that additional JavaScript and CSS you might have in your template files, to an external JavaScript and CSS file, and keep your templates clean and light.
This means that on the first load, your visitors can store certain files, and search engines don’t have to import them unnecessarily. To help clean up the code for your template, you will need to contact a developer.
Using a CDN:
A CDN stands for Content Delivery Network. It is a technique to deliver content on your website more quickly and efficiently to people based on their geographic location.
In essence, in places around the world, a CDN is made up of a network of servers (“points of presence,” or POPs).
The CDN server closest to a user is known as the “edge server” – they are linked to the nearest edge server when people request content from a website served by a CDN, ensuring the quickest response times possible.
Extensions for Magento
While Magento lets you control the basic SEO features, there are some things you won’t be able to do without coding or installing extensions.
To be more specific:
- You can not modify meta robots tag manually for individual pages.
- You can’t create your own canonical, and you can not alter the automatically created ones.
- There’s no support for hreflang (language) tags.
- Structured data markup is limited.
- Lazy loading isn’t supported.
A quick note before you start installing plugins to deal with these issues: you will probably need to make some changes to your PHP configuration.
Tons of free RAM is required for the script used for installing extensions on Magento.
By default, this value is restricted by most Apache servers to 512MB, which is not enough and approximately requires 2 GB. The php.ini file must be modified (look explicitly for the memory limit parameter).
In several instances, Magento overwrites master memory limit values. Look for files with .htaccess and .user.ini in the Magento directory and change the memory cap to a higher value.
Consider adjusting the execution time limit if that’s not enough (in php.ini., .htaccess and .user.ini). Something over 180 seconds should do the trick.
Remember that during the installation your shop will be put in maintenance mode, so it is good to install the extensions you need when you don’t expect your website to get a lot of traffic.
Performance extensions for Magento
Web performance is Magento’s weakest point.
If you do not have a powerful server with a decent amount of RAM and computing power, you will struggle. Fortunately, there are some free extensions that can help you:
- Code minifier by Apptrian
- Image optimizer by Apptrian
- JS parsing defer by Meetanshi
- Lazy load by Welt Pixel
These four extensions will grant a significant performance boost to your web performance.
Hreflang and Canonical Tags Extensions for Magento
Unfortunately, there are no free extensions that would help you change or add hreflang tags and canonical tags.
You’ve got to either spend some money or write a code of your own. However, the Magento group’s customer service team is involved and supportive, so don’t worry about their recommendations through documentation since it is marginally better than for other platforms.
However, if you do decide to spend money, here are the extensions you can use:
Structured data extensions for Magento
There are many extensions designed to help you manage structured data on your website, both free and paid:
Blog modules for Magento
If you want to have a blog be a part of your Magento store, you need one of the following extensions:
Awesome Blog by Magefan
Better Blog by Mageplaza
All-in-one SEO solutions
You can try any of the available SEO suites if you don’t want to instal too many extensions. These plugins are helpful, but their smaller specialised equivalents provide much more flexibility and configuration choices.
For example, here are some all-in-one solutions:
Advanced SEO Suite by Mirasvit
SEO Suite Ultimate by MageWorx
While the free extensions should cover your basic needs, you’ll need to purchase their paid equivalents for better quality and more possibilities.
Thus, your content, such as product images, are cached on a CDN, so it’s delivered from the edge server to your visitors much faster than if it had to be delivered all the way from the origin.
If you’re on Magento Commerce (Cloud), Fastly CDN is included, and its set up is well-documented. If not, you need to set up a CDN of your choice in Magento 2.
To do so, navigate to Stores > Settings > Configuration. Click on the Web under the General tab.

Magento SEO Checklist
Phew!
There’s so much you can do to improve the search engine rankings for your shop.
If, with all the above SEO tips and tasks that need to be completed, you feel a little stressed, then here’s a crisp SEO checklist that you can cross off as you make progress:
Using a CDN:
- Use only one H1 tag on each page.
- Compose compelling page titles (around 60 characters) and meta descriptions (under 155 characters).
- Create SEO-Friendly URL structure.
- Set an alt text and descriptive file names for all images.
- Publish useful long-form content such as how-to guides, listicles, and blog posts.
- Optimise all content and product copy for the right keywords.
- Setup HTTPS in Magento.
Off-page SEO:
- Build backlinks to your store via guest posting, blogger outreach, link reclamation, etc.
- Earn brand mentions from authority publications and social proof in terms of customer reviews along with better social media presence.
Advanced SEO:
- Make sure your site is indexed correctly.
- Create and submit the XML sitemap to Google.
- Eliminate duplicate content using canonical tags.
- Optimise the robots.txt file.
- Incorporate structured data for rich snippets.
- Implement 301 redirects when needed.
- Ensure fast page load speeds by optimising images, minifying CSS and JS, using AMP, and caching.
- Optimise themes.
Done!
That covers pretty much everything you need to get started on the right track towards ranking your Magento store on the first page of Google.
Start with the basic techniques of on-page optimisation and be consistent with off-page optimisation (building backlinks, receiving media mentions, and social evidence).
Then, use structured data, AMP, caching, and other advanced techniques to step up your SEO game.
As you can see, things are going to get a little technical with Magento, and yes, it’ll take a few months to see the fruits of your labour.
But in terms of higher rankings, authority, clients, leads, and eventually, sales, all that work is going to be super worth it!
However, we also have another, even better proposition for you!
At Pearl Lemon, our SEO experts specialising in Magento know exactly how to guide you and deliver you the best possible results.
Get on a call with us and hear us out!